

Wood Graining [ woo d-greyn-ing ] noun
1. the process of creating the warmth, richness, and beauty of wood on any surface
2. a material or finish that imitates the natural grain of wood in pattern, color, and sometimes texture
Traditionally, wood graining has been reserved for skilled craftsmen and fine artisans. They intricately used brushes or bird feathers dipped in secret formulas to simulate the look and beauty of wood. Now, Old Masters provides the Wood Graining Tool — a serrated squeegee and specially pigmented stain to produce the realistic grains and patterns of real wood. With a little practice, any average do-it-yourselfer can have great results. The purpose of this guide is to explain the basics of the Old Masters wood graining process and provide many helpful tips. These tips should help you avoid the normal pitfalls a beginner to wood graining might encounter.
Suggested Supplies
Base Paint - Eggshell or satin sheen coatings work best
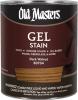
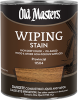
Old Masters Gel Stain or Wiping Stain
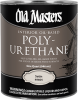
Old Masters Interior Oil-Based Polyurethane Clear Finish
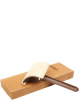
Old Masters Wood Graining Tool
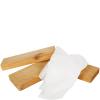
Foam brush
Tack rags
1 1⁄2” to 2” natural bristle paint brush
2 sheets of medium grit sandpaper (120-150 grit) 2 sheets of fine grit sandpaper (220-280 grit)
1” masking tape
Paint thinner or mineral spirits
Test material for testing and practice
- Please read and follow the instructions as printed on the product labels.
- You are responsible for providing a good working environment (dust-free, good lighting, and good drying conditions).
- Work in a well-ventilated area while applying base paint, stains, clear finishes, or any associated products. Pay close attention to all the cautions on the products used.
- Examine the item to be refinished or grained, making sure it is structurally sound. Make structural improvements before applying the base color. Remove glue spots or excessive caulk. Fill in scratches, nail holes, and the like. Always remove hardware before you begin.
The surface in which the base color is to be applied must be smooth, even, and in sound condition—no chipping, cracking, or peeling. It must be free of dirt, grease, and wax.
If your project has multiple coats of old paint or varnish, we recommend using a quality paint remover to strip the old finish off and start with a clean, smooth surface. If the paint on your project is smooth, tight, and in good shape, stripping is generally unnecessary.
Before you apply the base color, sand the surface lightly. Always sand a project in the direction of the wood grain—if you are uncertain of the direction, see Helpful Hints.
For average finished surfaces, a medium grit sandpaper (120-150 grit) should be sufficient.
For hard/slick or high-gloss surfaces, you may want to use a conditioner called deglosser. A deglosser is a chemical that prepares a slick or glossy finish to receive paint. Most paint dealers are familiar with this product and can suggest a good one for your needs. A high-gloss finish must be dulled to avoid easy chipping of the wood grain finish.
 Before you start applying the base paint, read the instructions found on the label.
In addition:
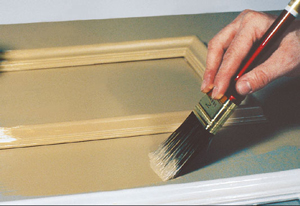
Having properly prepared the surface, you are now ready to apply your base color. A fine wood graining finish requires that you apply the base color by brushing in the direction of the grain. Brush marks going in different directions will show through the grain and lessen the effect. If you are uncertain of the direction, see Helpful Hints.
Apply the base color with a good quality brush. Try to minimize brush marks and coat the project as best as possible. If the base coat does not cover perfectly, don’t be overly concerned because the following steps will cover most imperfections. If the coverage is very bad, such as on a dark substrate, a second coat of the base color is advised.
Allow the base color to dry thoroughly. Under normal drying conditions, 24 hours should be adequate. However, temperature and humidity will cause drying times to vary.
We advise that you paint your test piece at the same time. This will prove helpful later for testing dry times on your project and will also provide good practice in working with the Old Masters Wood Graining Tool.
Before applying the Gel or Wiping Stain, be sure to read the instructions and cautions on the Gel or Wiping Stain label.
After the base coat is fully dried, lightly sand in the direction of the grain and brush strokes. Wipe the surface clean with a tack rag to remove sanding residue. Ensure there is a smooth and dust-free surface before staining.
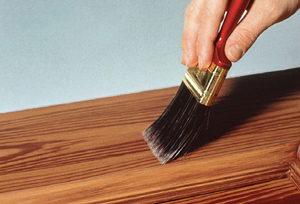
Apply Old Masters Gel or Wiping Stain very lightly on your project with a foam brush. Don’t dip the brush into the stain like you would paint; rather, lightly touch the tip of the brush to the stain. This stain is thick and rich in pigment; therefore, a little goes a long way and too much will make it more difficult to get a thin coat. Keep the first coat light. It will be your undercoat for your wood graining, so shade or blend it to your desired background color. Ideally, you want this coat to be very smooth and free of blotchy stain deposits. Light streaks or fine lines shouldn’t concern you, but don’t allow lap marks. Like with the sanding and application of the base coat, brush on the Gel or Wiping Stain in the direction of the grain. For better looking corners, see Helpful Hints. Allow this stain coat to dry thoroughly, usually 12 hours under ideal drying conditions. Don’t forget to apply the first coat of stain to your test piece as well.
 After the first stain coat is completely dry, you are ready to apply your second coat of stain and use the Old Masters Wood Graining Tool.
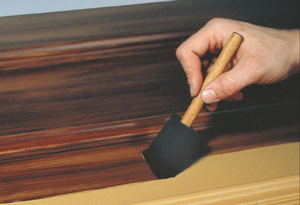
Apply a thin, second coat of Gel or Wiping Stain over one section of the project at a time. Continue to use a foam brush for this coat as you did for the first. While the stain is still wet, use the Wood Graining Tool to create the desired pattern.
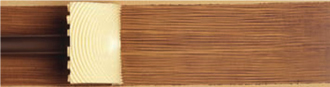
The Old Masters Wood Graining Tool is a simple device that allows the user to rearrange the stain into patterns that resemble wood grain. It is relatively simple to use, but it is difficult to explain in writing. Your patience and practice with the Wood Graining Tool will make the whole process much easier. The following pages describe in depth how to use the tool.
 Using the tool
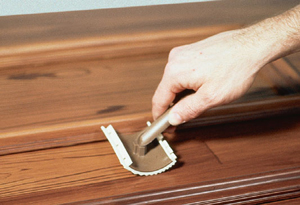
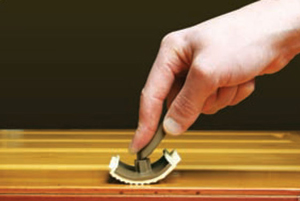
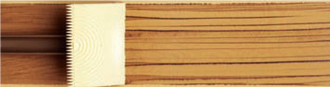
Hold it by its handle and place your index finger directly on the base of the head where the handle and curved portion of the tool meet. Press the face of the tool firmly against the surface of your project and slide it along in a straight, smooth motion.
Try it out on your test piece. Spread a thin coat of Gel Stain or Wiping Stain over your test piece with a foam brush. Now try using the Wood Graining Tool. Press firmly and slide the tool along at a gentle speed. Think of the motion similar to how you would drag a squeegee on glass. On your second pass, try sliding and rolling it just a little. Create all kinds of patterns with just one tool. By changing the pivoting point on the tool, you change the pattern.
All the basic designs shown below can be created with the Wood Graining Tool.
Pulling the tool from top to bottom.
Pushing the tool from bottom to top.
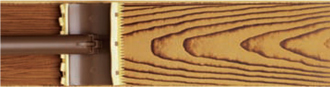
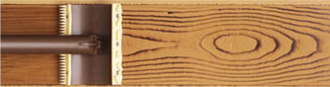
Vein Grain
Vein grain is achieved by using the comb edge of the tool. Vein grain is usually used between and around the major patterns to join and blend the designs into a realistic simulated wood finish.
Quarter Sawn Grain
Quarter sawn grain is achieved by using the notched top edge of the tool; basically, flip the tool over. Much like vein grain, quarter sawn grain is a secondary pattern for blending.
Knots
Create knots using a rocking motion of your wrist as you move the tool. Beginning with the tool on the center of the curved part, rock it to the bottom and then back to the center, and you’ve created a knot. By varying the length of time you spend in the rocking motion while moving, you’ll create short, stubby knots or long, skinny knots.
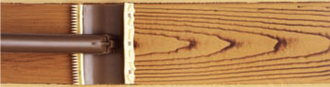
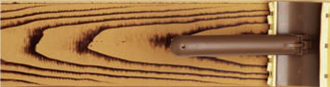
Heart Grain
Use the face of the tool to create heart grain, a common pattern.
Two important secrets for using the Wood Graining Tool:
- Maintain good, constant pressure. For the tool to work effectively, it must have constant contact with the surface of the project. Obviously, if the tool does not touch firmly, it cannot rearrange the stain.
- Keep the tool in constant motion. You can go slow; or you can go fast, but you cannot stop. The tool must move across the surface in a smooth and uninterrupted motion.
When your wood graining effort is complete, allow the stain to dry for no more than 15 to 20 minutes. Then, using a soft dry bristle brush, gently stroke (dry brush) the entire surface to blend the color, create jagged edges, soften design, and add an even more natural look to your simulated wood finish. This step is often referred to as “feathering.”
Allow the second coat or wood graining coat to dry thoroughly after feathering. Ideal drying conditions (temperature and humidity) will yield a drying time of about 12 hours.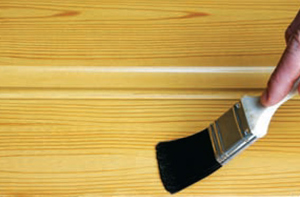
 Old Masters clear finishes are the perfect finish for any wood graining project. We suggest using a satin sheen.
For interior applications, we suggest Old Masters Masters Armor® Interior Water- Based Clear Finish or Interior Oil-Based Polyurethane for an excellent, durable finish.
For exterior applications, we suggest Old Masters Spar-Marine Varnish or Ascend Exterior® Water-Based Clear Finish because of its excellent durability and ultraviolet absorbers.
1. After your second coat of stain has dried thoroughly, gently remove any dust with a tack rag. Do not use a rag dampened in mineral spirits and do not sand at this point. Be sure to review the instructional information and cautions printed on your clear finish label.
2. Apply the clear finish in a smooth, even coat with a foam or good-quality natural bristle brush. Avoid excessive brushing and be careful not to have runs or drips. Allow this coat to dry six hours or more depending on humidity and drying conditions.
3. Gently sand or use steel wool on first clear finish coat, wipe away dust with a tack rag, and apply a second coat as above. The second coat of clear finish should be fully dry to touch in about six hours, depending on drying conditions. It will take about 36 hours before your polyurethane coat is completely cured and will provide maximum protection.
For exterior applications, three coats of clear finish is usually recommended for maximum protection. Avoid heavy use until the finish is fully cured.
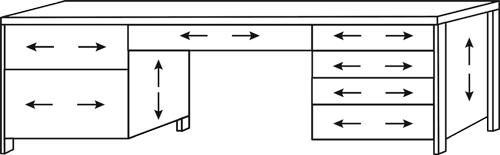
This section includes some helpful rules to follow to determine what direction the grain should be going when your project is finished.
If your project is wood, always sand, paint, and faux wood grain in the direction of existing grain.
Use these general rules & illustrations to help determine the proper grain direction.
Upper Cabinet
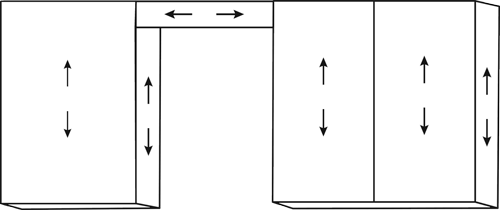
Lower Cabinet
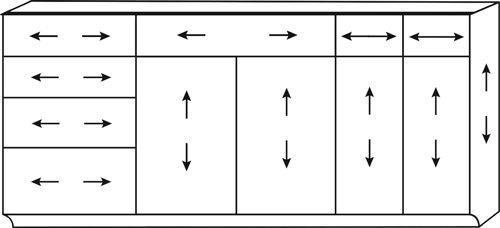
Desk
Metal Door
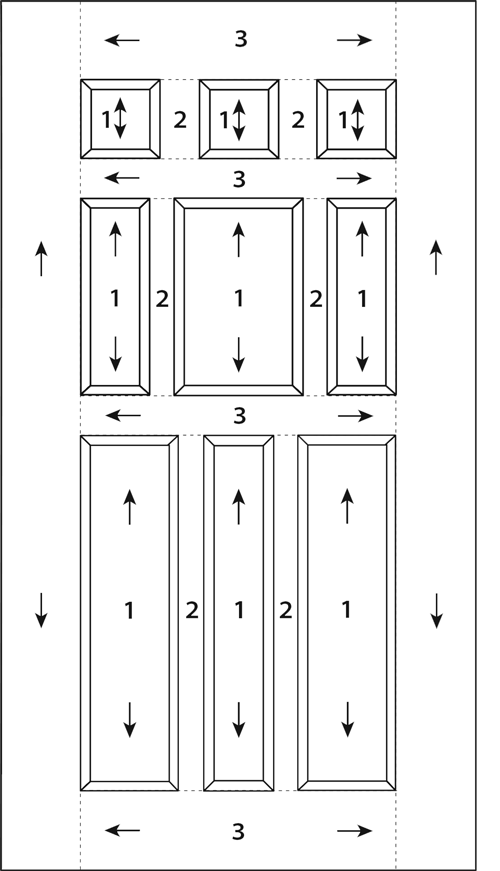
If your project is metal or another material other than wood, it can be more difficult to determine the proper grain direction. We suggest the following basic rules mentioned earlier and the following rules that are more specific to metal doors to determine proper grain direction:
• The two boards running vertically on the far left and the far right always run the full length of the door.
• The boards running horizontally in the door will always reach from one outside vertical board to the other outside vertical board.
• All other boards and panels will run vertically between the horizontal boards.
The numbers in the illustration indicate an ideal sequence for wood graining and the dotted lines suggest the places to use tape.
 Cross Graining
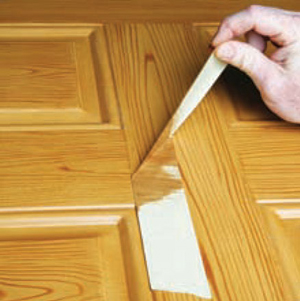
For doors and some other wood graining projects, a solution for joints or cross-grained corners is needed.
To make it easier to get cross grain corners and joints, we suggest a light line with a pencil and then stick masking tape along the line. After this taping, immediately and carefully grain your pattern using the Wood Graining Tool up to and onto the tape. Carefully remove the tape when you are happy with the pattern. Never leave the tape on overnight.
1. What can I wood grain?
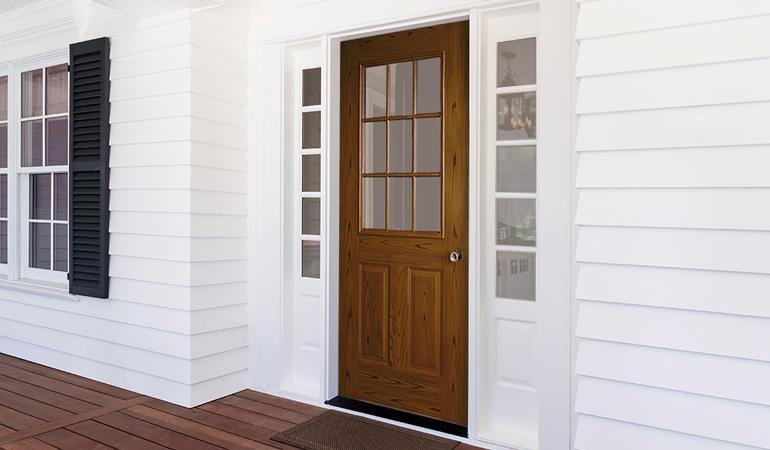
Nearly any smooth, flat surface in which a base color can adhere to can be wood grained. Various surfaces, including metal, plastic, painted objects, or Masonite can be wood grained. You can make almost any object look like wood including metal file cabinets, kitchen cabinets, tables, bookcases, chests, vanities, steel doors, paneling, dressers, desks, and more.
2. Must I strip off the old paint or varnish?
Removing the old finish is almost always best, but it may not be necessary on your project. If the old finish is in good condition, it may be possible to wood grain over it.
3. What if I don’t get the wood grain pattern I desire, can I change it?
Yes, as long as the stain is still wet. You can simply erase by re-wiping the stain over the pattern you don’t like and use the tool again.
4. How long will it take to do a steel door?
Actual work time for our professionals to wood grain a nine panel steel door is approximately 5 hours. However, with little to no experience, it may take you 5 to 10 hours.
5. Can I wood grain my door while it is still on the hinges?
Yes, but you will find it much easier to work with when it is lying flat.
6. Can I touch up the finish?
Yes, you can touch up scratches and imperfections as you can on most finishes. Most often chips and scratches can be hidden by dabbing stain on the damaged area with an artist brush. If the damage is severe it may be a good idea to go back to the base paint, then stain and follow up with polyurethane. Perfect touch ups, like most finish repairs, are hard to achieve.
7. Is the tool the entire secret to wood graining?
No, there is more to the graining process than just the tool. Why? First, to arrive at the intended color, it is important to use the right colored components. Second, although there is some latitude with regards to the base coat, we would encourage using an eggshell or satin sheen coating for durability and ease of graining. The stain you use for the actual graining is of utmost importance. The Old Masters Wiping and Gel Stain is specially formulated for staining wood and wood graining. For wood graining it has the slow drying characteristics needed and stays separated when tooled. It also has excellent blending and feathering characteristics.
8. How do I remove the wood graining?
The wood grain can be removed as you would remove any paint; with a good quality paint stripper or remover.